
Scenario AI Assistant
In this article we will cover:
— setting up and training the AI assistant;
— purchasing and using ChatCoins;
— how to work with the assistant in dialogs.
The Scenario AI Assistant is an intelligent helper that assists operators in quickly and accurately composing replies to customers. The assistant analyzes the conversation, understands the dialog context, and uses the knowledge base it was trained on to generate a meaningful response.
Scenario AI Knowledge Base
In the ChatApp account, go to: Chatbots Beta → Scenario AI Knowledge Base
You can train the assistant in one of the following ways:
Supported formats: .txt; .docx; .pdf
Limits: max. size of one file — 80,000 characters
You can upload up to 10 files, 5 MB each
Step 1. Select the “Files” training method.
Step 2. Add files with your knowledge base.
Training starts automatically after a file is added. The processing status is shown next to the file.
If there are not enough ChatCoins, the file will show an insufficient balance status. Top up your balance and update the file via the three-dot menu.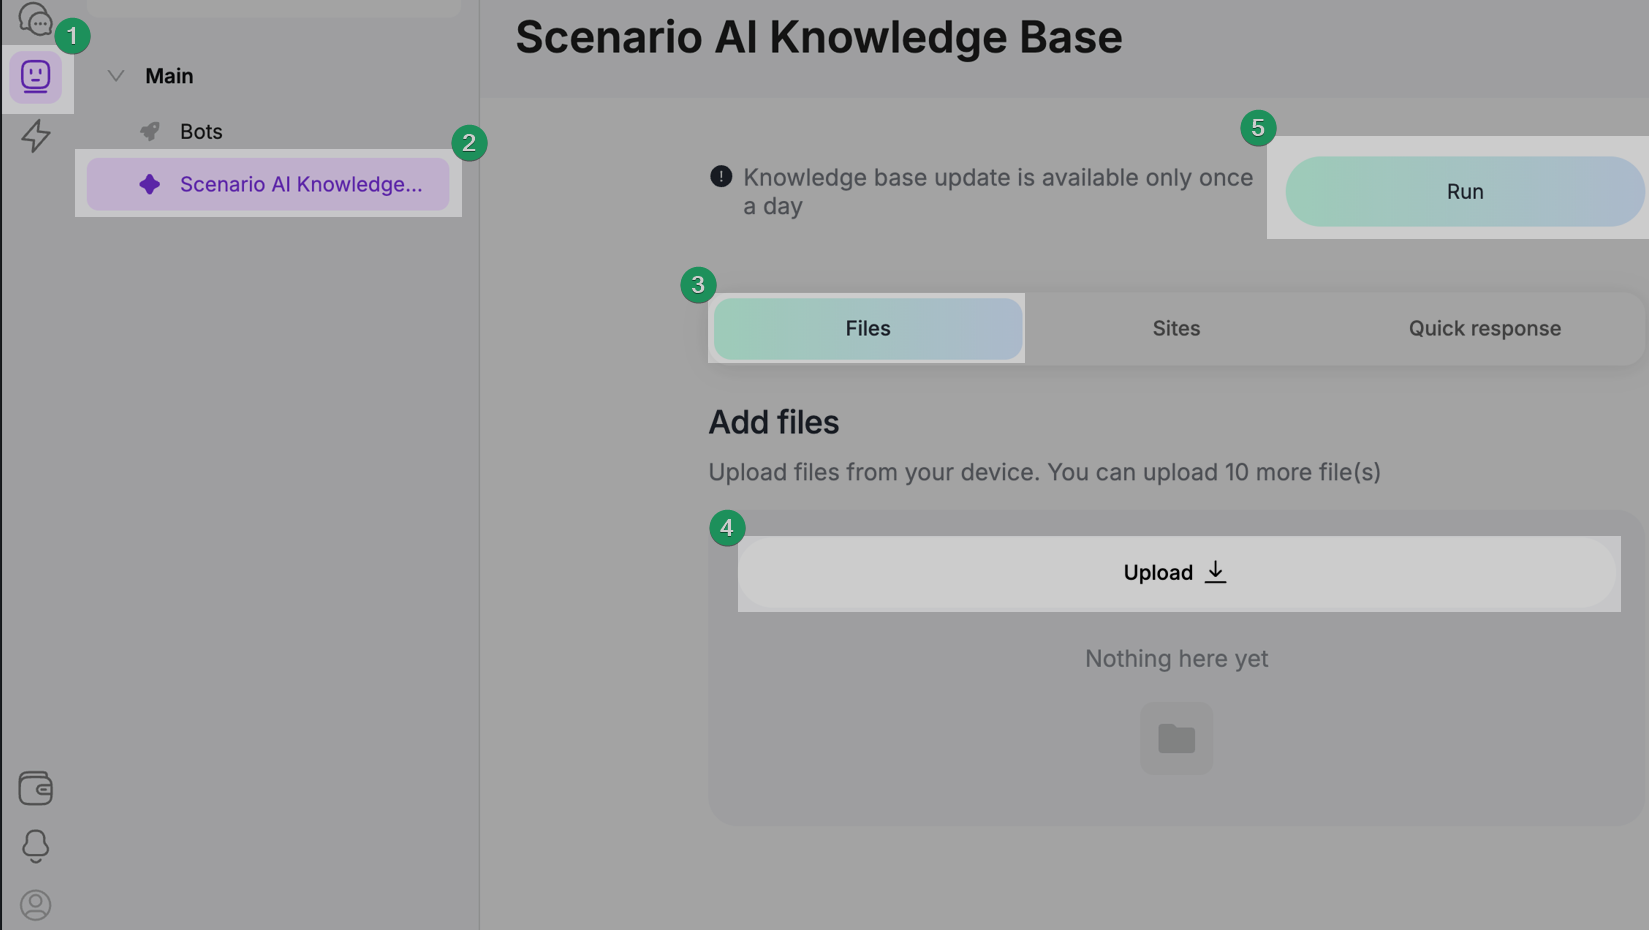
To delete a file, hover over the file and click the trash icon.
Use this method if your knowledge base is published on your company website.
Training from a website
Step 1. Select the “Websites” training method.
Step 2. Click “Add link”.
Step 3. Enter the website URL.
Step 4. Select the “Website” training mode.
Step 5. Click “Next”.
Step 6. Use the checkboxes to select the website sections to use for training.
Step 7. Click “Save”.
Website processing starts automatically. The system will analyze up to the first 500 pages.
When processing is finished, you will see: the number of successfully processed pages and pages with errors, if any.
Via the three-dot menu you can open details, update the website (re-index), edit the page list, or delete the material.
Training from a single URL page
If you need to train the assistant using a specific website page:
Step 1. Select the “Websites” training method.
Step 2. Click “Add link”.
Step 3. Enter the page URL.
Step 4. Select the “Page” training mode.
Step 5. Click “Save”.
Processing starts automatically.
This method lets you train the assistant on quick replies you have already created.
Step 1. Select the “Quick replies” training method.
Step 2. Click “Generate”.
Step 3. Select a project.
Step 4. Turn on the toggle.
Step 5. Click “Generate quick replies”.
Processing starts automatically; if needed, you can update all quick replies or each one separately.
If you have not used Quick replies yet, we recommend reading the guide.
The knowledge base is trained on uploaded sources right away.
ChatCoins are charged separately for processing files, websites, and quick replies.
ChatCoins: what they are and how they are used
ChatCoins are an internal unit of ChatApp used when working with the Scenario AI Assistant.
ChatCoins are deducted when the assistant performs an action in the chat — generating a reply to a customer, changing the tone of the text to friendly/formal, or summarizing the dialog.
Scenario AI Assistant pricing
A certain number of ChatCoins is deducted for each AI assistant action.
The deduction occurs at the moment the selected action is performed.
| Scenario AI Assistant action | ChatCoins deduction |
|---|---|
| Generating a response to a customer question | 1 ChatCoin |
| Rephrasing text (friendly or formal style) | 1 ChatCoin |
| Making a response more concise or more detailed | 1 ChatCoin |
| Correcting spelling and grammar mistakes | 1 ChatCoin |
| Summarizing a dialog | 2 ChatCoins |
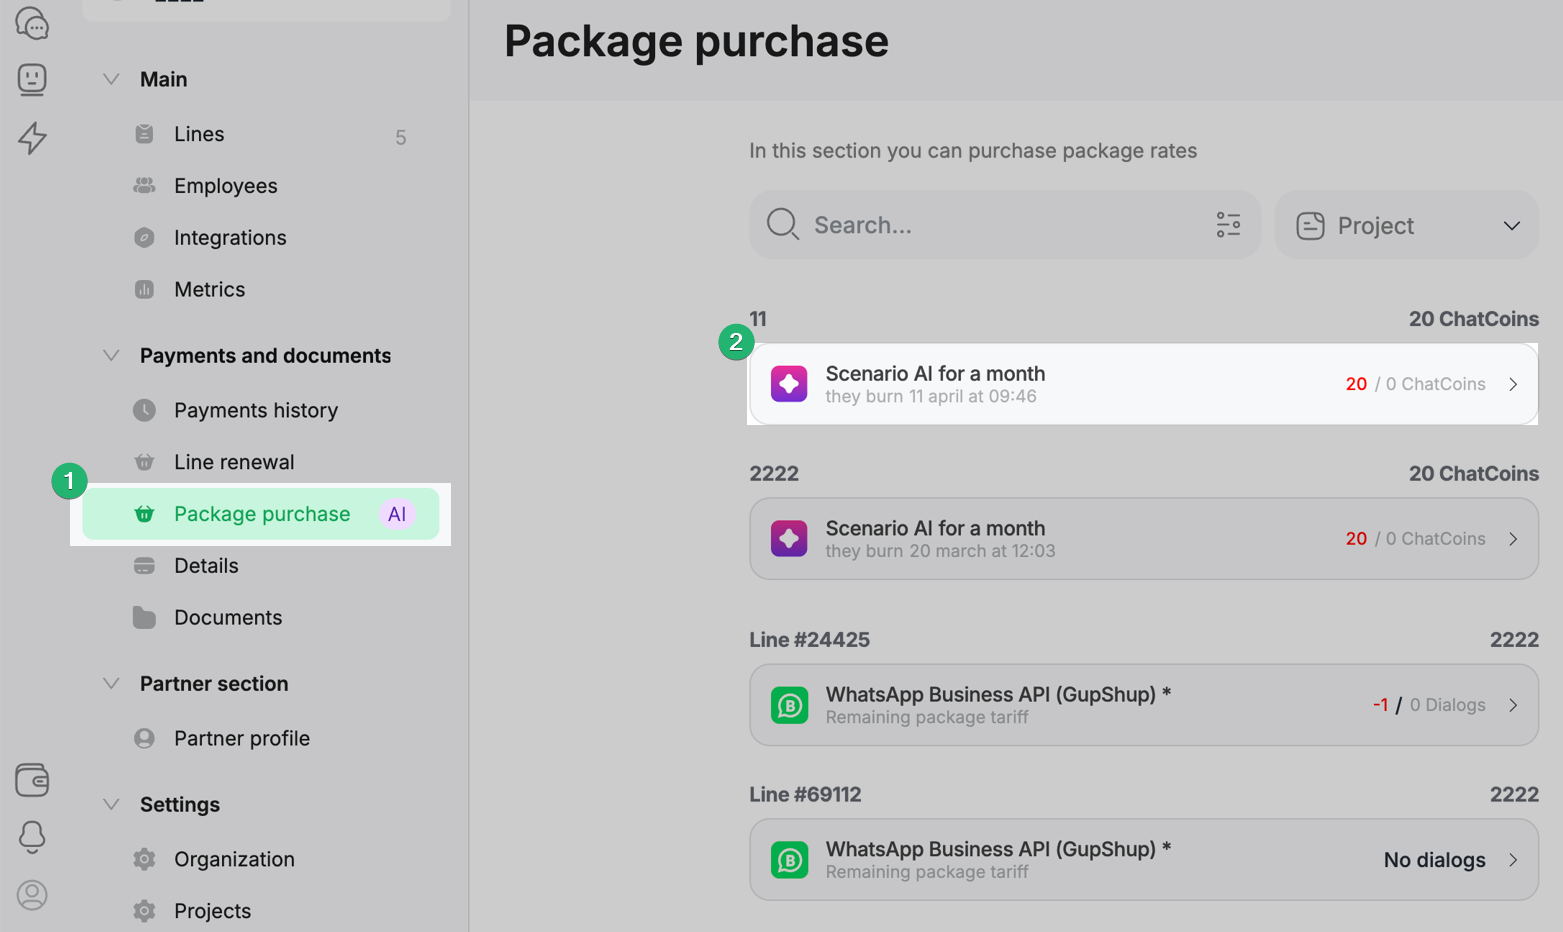
Step 1. Open the “Purchase packages” section and click on the plan with ChatCoins → Buy ChatCoins
Step 2. In the ChatCoins field, specify the number of packages.
One package contains 500 ChatCoins. In one purchase, you can buy from 1 to 5,000 packages.
Step 3. Select the project for which the ChatCoins are purchased.
If there are several projects, click “Add more” and specify the number of packages for each.
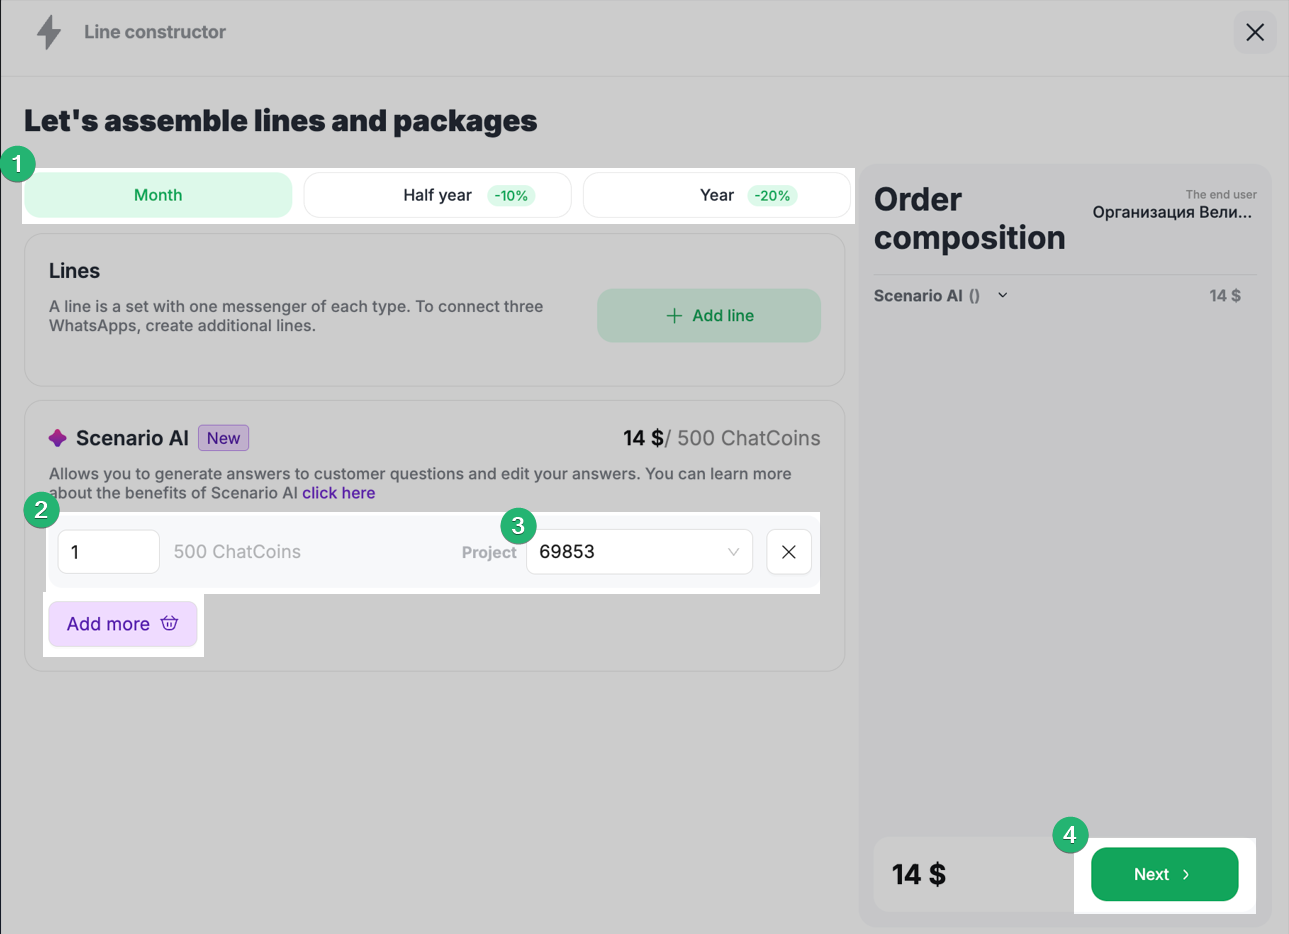
Step 4. Select the validity period of ChatCoins — 1, 6, or 12 months, click “Next”, and choose a payment method.
Auto payment does not apply to the purchase of ChatCoins.
Each month, 20 ChatCoins are credited to every project — this is a bonus from ChatApp 🎁
Unused ChatCoins are not carried over to the next month.
When purchasing a package for 6 or 12 months, ChatCoins are credited every month to the selected project. The number of credited ChatCoins depends on the number of packages: 1 package = 500 ChatCoins. The first accrual occurs on the day of purchase. After that, ChatCoins are credited on the same date each month until the selected period ends.
If ChatCoins run out before the next accrual date, you can additionally purchase a 1-month ChatCoins package. At the same time, the main monthly accrual continues unchanged.
Example: Alexey purchased 1 package for 12 months. This means he receives 500 ChatCoins every month. On the day of purchase, Alexey received 500 ChatCoins. One month later, on the same date, he will receive another 500 ChatCoins. This will continue every month until the package expires.
If ChatCoins run out before the accrual date, Alexey can additionally purchase a 1-month package. At the same time, on the date of the next monthly accrual, he will again receive 500 ChatCoins.
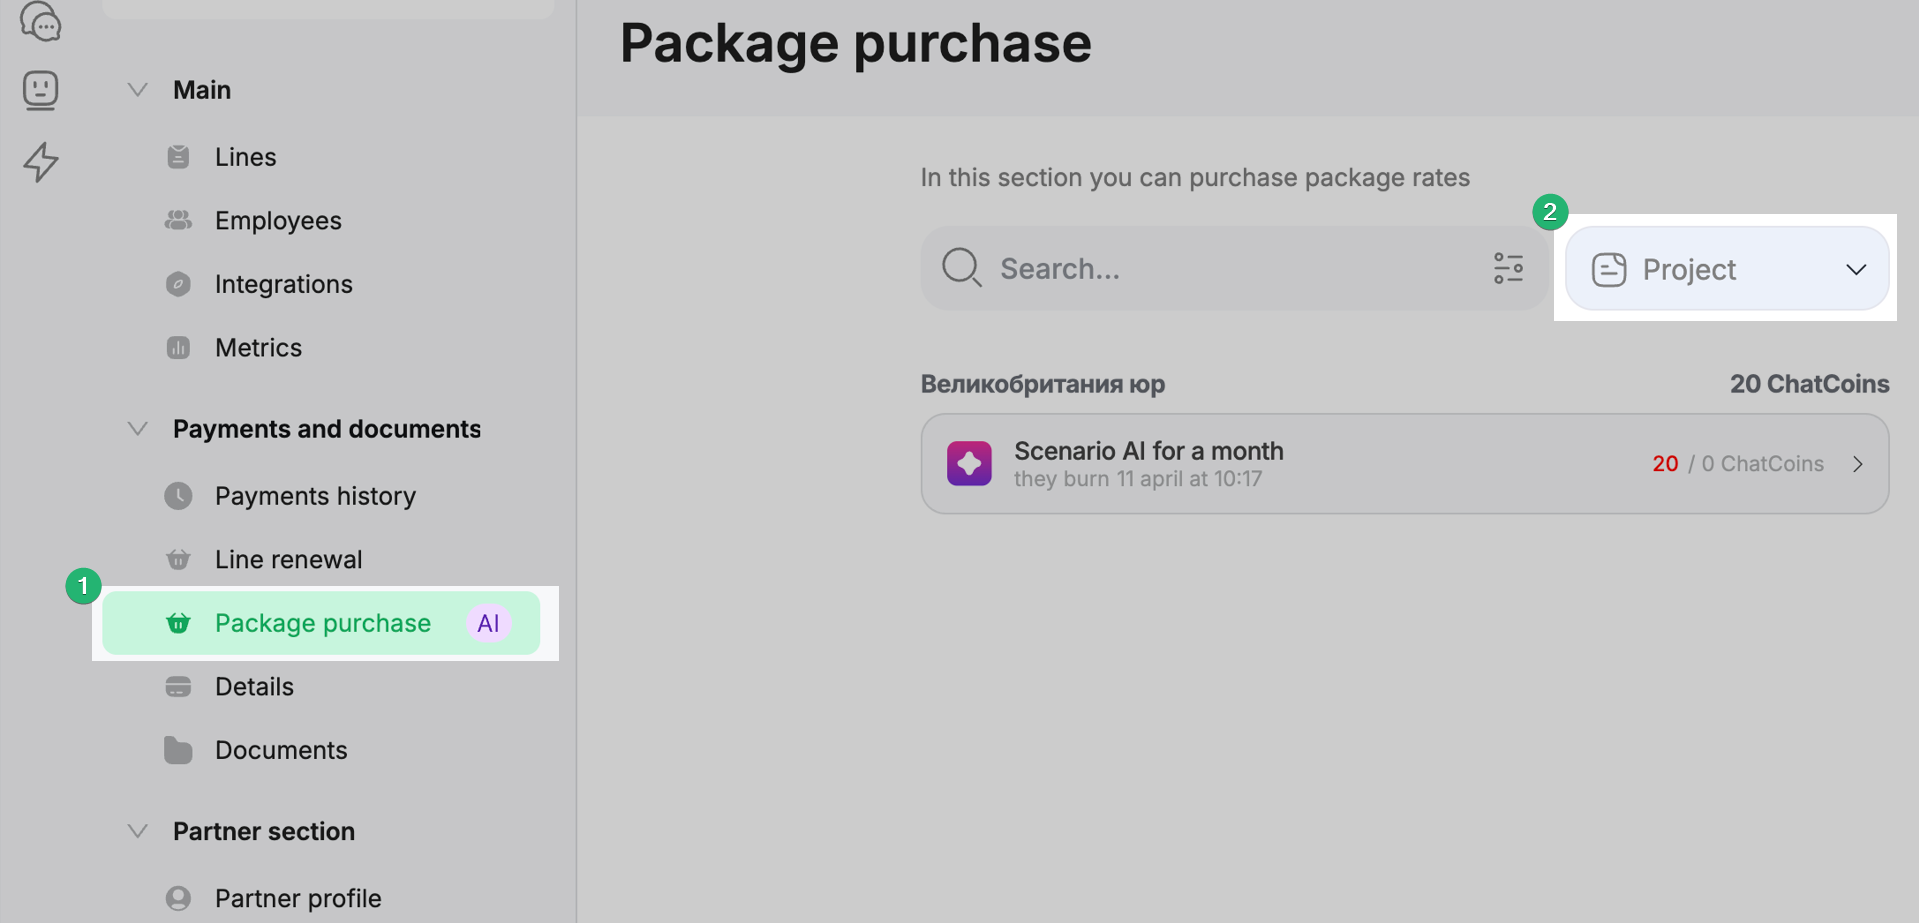
The purchase history of ChatCoins packages is available in the section “Payments and documents” → “Purchase packages.” In this section, you can filter payments by project and view:
— the package validity period;
— the next ChatCoins accrual date;
— the expiration date.
When opening a specific payment, the remaining ChatCoins balance for the selected project is displayed.
Using the Scenario AI Assistant in dialogs
Open Scenario Dialogs and go to the chat with the customer. In the message input field, the Scenario AI Assistant buttons are displayed — they allow you to work with text and generate replies.

AI Button — this button allows you to modify the text entered in the message input field: rephrase it, choose a more friendly or formal style, make the response more concise or, наоборот, more detailed, or summarize the dialog.
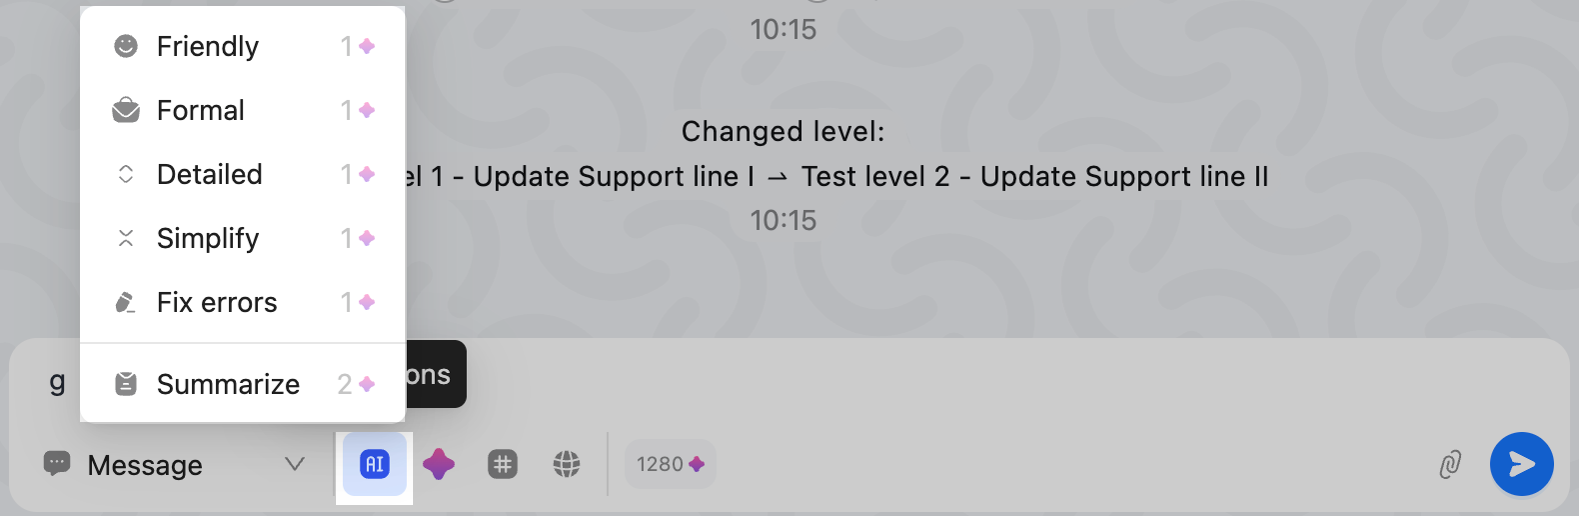
After the action is performed, the assistant shows the original text and the version suggested by the assistant. You can compare them and, if necessary, edit the text before sending it to the customer.
Star button — this button is used to generate a response to the customer. The assistant analyzes the customer’s question and the context of the dialog, after which it forms a ready response based on the knowledge base. The generated text is automatically inserted into the message input field and can be edited before sending.

Star button with a number — the number next to the icon shows the current remaining ChatCoins balance for the project.

